
This is the start of a modding tutorial for Minecraft. This is a work in progress.
Overview
- Introduction
- Learn Java
- Install the Java JDK
- Install an IDE
- Download the Forge MDK
- Choose a mod name - spacing/capitalization/uniqueness
- Prep your mod
- Copy Forge files into new directory
- Update build.gradle - versioning, modid, group, mappings, sources, mods.toml
- Update mods.toml - version, modid, displayName - credits, description, etc. are optional
- Set up version control
- Import mod into IDE
- From startup window, click Open. Or go to File > New Project from Existing Sources.
- Start your mod
- Delete example package
- Create new package
- Create main mod file - MODID, @Mod, constructor, logger
- First item
Introduction
This tutorial will teach you how to make your own Minecraft mod.
What is Minecraft?
Minecraft is a fantastic game that lets you build virtually anything you can imagine. One of the big draws of Minecraft is the many different types of gameplay it supports. You can play in survival mode if you want a bit of a challenge, enjoy fighting monsters and exploring, and want the satisfaction of really earning what you build. You can play in creative mode if you want the unbridled freedom to build whatever you want and express yourself creatively. You can play alone, with a small group of friends, or with random strangers on massive multi-player servers.
Regardless of their preferred mode of play, many Minecraft players eventually start using mods.
What are mods?
Mods are essentially modifications to the code that runs Minecraft. Mods change the game, allowing you to add new items, blocks, or monsters, among other possibilities.
Some players who use mods eventually, perhaps inevitably, start having their own ideas for mods that would make the game more fun for them. Some get the itch to make their own mod. That’s what this tutorial is for.
Is it legal to make mods?
The short answer is yes. Mojang’s EULA for Minecraft explicitly states that mods are OK to create and use with Minecraft, as long as you aren’t distributing modded versions of Minecraft. You can only distribute your mod itself.
You can read about this yourself in Minecraft’s EULA page under the USING OUR GAME section.
Who should use this tutorial
Let’s get one thing straight right off the bat: modding is programming. To create a mode, you must learn to program.
This tutorial is aimed at Minecraft gamers with no prior experience with modding or programming. However, this is not a programming tutorial, and you will be expected to learn some programming on your own. I will give you plenty of tools to do this, and will try to provide you with advice appropriate for a beginning programmer.
If you already have some experience with programming or Minecraft modding, you can still use this tutorial. It will be fairly easy for you to skim or skip sections that you already know about.
Who am I, and why should you listen to me?
My name is Benjamin Rose. I’m a professional technical writer for a software company. I write user manuals, tutorials, and instructions for my job. I’m also an avid Minecraft gamer, and I’ve released two mods. I have several other mods in various states of incompletion that I hope to release one day.
I am not a professional programmer, but I’m pretty tech savvy and have taught myself enough Java to write my own mods. I’m a quick learner and know how to figure out how technology works—I have to do it every day for my job. So while I may not know all the advanced features of Java, I have the right background to teach others how to get started with modding.
In some ways, not being a professional programmer is an advantage, because I’m not as deeply afflicted by the curse of knowledge when it comes to programming and other aspects of modding. I probably do have the curse of knowldge in some areas, but as a professional technical writer, I’m usually able to recognize and work around it.
On the other hand, I’m not nearly as experienced at programming or modding as many other modders in the community, and I’m sure I have some blind spots and knowledge gaps. If you see a mistake or bad advice in this tutorial, please let me know! Email me at daeruin@benjaminrose.com.
The general approach of this tutorial
While some tutorials get very specific about how to make your mod, I try to provide you with choices whenever possible. I believe you will be a better modder and your modding experience will be more satisfying if you can make your own choices and understand the impact of those choices.
The disadvantage of this approach is that I won’t be able to walk you through exact steps in some cases. There are simply too many possibilities, and your path will be unique.
In some cases I may provide exact steps for one of the many choices you can make. If you choose another path, you may need to rely on sources outside of this tutorial.
I’m also well aware of the overwhelming tendency among beginning modders to charge ahead without taking the time to understand what they are doing. I firmly believe that you will be more successful and more happy as a modder if you take the time to learn the concepts behind what you are doing. So this tutorial provides more background and context than some other tutorials out there.
Other resources for learning to mod
As you work your way through this tutorial, you may find yourself in need of extra help. I recommend bookmarking the following resources. Try them out anytime you need additional help.
- The Forge forums — This is the single best place to get help with your modding. There are lots of really knowledgeable and helpful modders there who can help you with problems that are specific to modding and Forge. The caveat is that they only support the current and immediately prior versions of Minecraft, and they really won’t help you with basic Java. That’s one reason why it’s important for you to learn Java before you start modding.
- The Forge Discord server — Depending on your preferred mode of communication, this is as good or better than the Forge forums as a way to get help with your mod. If you haven’t used Discord before, it’s like a massive forum for voice and text chat that’s often used by the gaming community. I have not personally participated in Forge’s Discord server, but many people prefer it to the forum.
- The official Minecraft forums — They have a modding subforum that has occasionally been useful to me, primarily when I need help with a version of Minecraft that the Forge forums don’t support. They are not as active, so you might not get an answer.
- The Stackoverflow minecraft-forge tag — I have only used this option once myself. But there seems to be a pretty active community there.
This tutorial is only one way to learn how to mod Minecraft. It may not necessarily be the best way for you. Or it may not cover your unique situation. I can recommend the following tutorials and modding aids as alternative or supplementary help in your modding journey.
- Cadiboo’s tutorials — These are possibly the best tutorials I’ve seen and are a great way to get started with modding. They haven’t been updated in a while and don’t go very deep into modding topics. At the time of this writing, they cover versions 1.12 to 1.15 of Minecraft.
- Shadowfacts tutorials — These tutorials are very helpful and well done. I used them myself in my early days of modding, and I highly recommend them. They only cover versions 1.10-1.12 of Minecraft.
- MinecraftByExample by TheGreyGhost — This is an example mod with fully functioning code and instructive comments to help you figure out how to implement various modding ideas. It covers versions 1.8.9 through 1.16 of Minecraft and is a great resource once you get familiar enough with Java to be able to read code on your own.
- TestMod3 by Choonster — This is another example mod that covers many modding concepts. It covers versions 1.8 through 1.16 of Minecraft. Although it can be very helpful, I don’t generally recommend this one until you have some pretty solid Java experience under your belt, as Choonster frequently uses advanced Java concepts in his code.
Learn Java
Modding is programming. To make mods, you need to learn programming. You can’t magically program just by wishing it.
Many of you will be tempted to skip this step. You have a great idea, you’re fired up, and you figure you can learn as you go.
I’ve been in your shoes, and I urge you not to skip this step. Every hour you spend learning Java before you start modding will save you many hours of frustration and disappointment later on.
Let me paint you a picture of your modding life if you choose not to learn Java first.
In the beginning, things will go pretty well. You’ll follow a tutorial like this one, you’ll copy some code here and there, and your mod will work. You’ll get a few items or blocks into the game, and it will be very exciting!
Then you’ll have an idea that’s a little harder. Maybe you want a block to change when you right click, or you want to do something with the player inventory, or tweak some mobs. You may even find a tutorial that helps you get most of the way there. At some point, you will run into a bug or problem that you can’t figure out how to solve. Or someone using your mod will report a serious bug that crashes their game.
You’ll take some stabs in the dark and tweak your code in random ways hoping to solve the problem, but nothing will work. Your Google searches won’t turn up any answers that help with your specific problem. After a few hours of frustration, you’ll be forced to turn to others for help.
You may go to the Forge forums and ask for help from the experts. They will ask you to post your code. Very quickly, the experts on the Forge forums will detect that you don’t know Java. You’ll use some n00b terminology, or your code will look like a mess. And they will politely tell you to go learn Java. Because trying to help someone who doesn’t know the language of modding is quite frankly a waste of their time.
You will be stuck, and you’ll waste many hours of your precious time trying to do stuff you don’t actually know how to do. In the end, your mod just won’t do what you want it to do, and you’ll have to give up, or settle for something that’s not what you wanted.
By choosing to become a modder, you are choosing to become a programmer. You may be an amateur programmer, but you will still be a programmer. There is no way around this. Modding is programming, plain and simple.
I’m not saying you need to take some college classes and become a pro. But you need a baseline of knowledge about Java and programming principles.
I’m also not trying to scare you away from modding! Learning Java is very doable, and it can be really fun! Feeling competent and learning a new skill is so satisfying. When you have an idea for a mod, and you’re competent enough at Java that you have confidence in your ability to figure out how to achieve your idea, you’ll feel amazing.
You can do this. And your future self will be very grateful!
Resources for learning Java
There are practically endless resources to help you learn Java. The programming community is eager to help you. Here are some of my recommendations. Amost all of these resources are free.
- Codecademy — Codecademy features an interactive tutorial where you can practice as you learn. They walk you through the basics of Java step by step. This is the first site I used to learn Java. It’s highly recommended.
- CodeGym — CodeGym is focused on learning through practice. By completing any of the 1,200 tasks on their platform, you’ll learn very quickly and, importantly, you’ll really remember what you learn, because you have to use it.
- Hyperskill by JetBrains Academy — Hyperskill’s Java developer track features project-based learning, so you get to practice and learn when certain Java features and concepts are applicable. JetBrains is the company behind IntelliJ IDEA, the amazing Java IDE that I recommend you use for modding.
- Interactive Java Tutorial by w3schools — w3schools is a very respected and well-used website that will walk you through Java step by step. It provides an interactive editor where you can tinker and experiment to see what happens. I have not personally used their Java tutorials, but I have used their CSS tutorials and found them very valuable.
- The Java Tutorials by Oracle — Oracle are the makers of Java, and they have a great series of tutorials for those who have no programming experience. This was the second site I used to learn Java, and I found it very helpful! The explanations are concise and clear. It is fairly heavy on the reading, almost like learning to code from a book. This is actually a good thing in many ways.
- Java in Easy Steps — If you prefer to learn from a book, I have heard good things about this one. It’s about $10 on Amazon.
- Udemy and Coursera — These sites are both very similar. They offer comprehensive Java courses taught by professionals and feature video and exercises to help you learn. Udemy courses will cost you money, while Coursera’s are free and offer a paid certificate at the end. Many people have used these courses successfully. I’ve personally used other courses on Udemy and found them to be very helpful. One advantage is that they are guided courses with a teacher available to ask questions.
Any one of the above will probably be more than sufficient to ease you into learning Java. Check out the links and pick one that you think will work for you.
At some point, you will run into some terms like polymorphism, encapsulation, interface, and other terms from object-oriented programming that might be confusing. This YouTube video by Alex Lee explains these concepts simply in just 10 minutes. It’s worth watching once you’ve gone beyond the very basics.
Java communities
You should also consider joining a Java forum so you can ask questions and get help along the way. Here are some to consider:
Install the Java Development Kit (JDK)
In order to start modding Minecraft, you have to install the Java Development Kit (JDK). This allows you to go beyond just using Java applications and lets you create Java applications using the Java programming language. The JDK is for free.
Download the JDK
There are many different versions of the Java JDK, and it’s important that you install the right one for modding. There are two primary sources for the JDK: Oracle and OpenJDK. Either one will work just fine, but there may be some minor advantages to one or the other depending on your situation.
If you’re using Windows, one advantage of using the OpenJDK version is that you can choose to let it set the appropriate environment variables for you. Another factor is that OpenJDK is an open source organization, so if you want to support open source, consider using OpenJDK. I personally use Oracle, mainly because I didn’t know about OpenJDK when I first started modding.
Download links:
- Java JDK download from Oracle — Download the Java SE 8 JDK.
- Java JDK download from OpenJDK — Download OpenJDK 8 (LTS) using the HotSpot JVM (you could use the OpenJ9 JVM, but it’s meant more for enterprise applications).
Install the JDK
Installing the JDK is pretty straightforward—you install it like any other software. If you need additional help, refer to the installation instructions for the JDK you chose:
- Oracle’s installation instructions
- This link takes you to the overview page, where you can find separate links with instructions for Windows, Linux, and Mac. Note that the Windows installation has a step for setting your environment variables (see this StackExchange question for help understanding environment variables).
- OpenJDK’s installation instructions
Java background
If you’re anything like me, you might be a little confused about different versions of Java and want a little more information on why you need the particular versions I recommended.
Java was first developed by Sun Microsystems. Java is both a programming language and a platform. The programming language is what you use to code and build Java applications, and the platform is what you use to run the applications. Because the Java platform comes with a Java Virtual Machine, Java applications written for that platform can be run on any compatible system. This is part of what has made Java so popular today.
Sun Microsystems released Java as free and open source software in 2006 and 2007 under the GNU General Public License (GPL). That opened Java up to being developed and implemented by other people.
Later, Sun Microsystems was purchased by Oracle. That’s why the primary way of getting Java is through Oracle today. However, because Java is open source, you can also get Java implementations from others. The most prominent of these other sources is OpenJDK.
Oracle has released a number of different editions and versions of Java. I’ll explain them here. There are four main Java products:
- Java Platform, Standard Edition (SE) — This is the one you’ll use for Minecraft modding.
- Java Platform, Enterprise Edition (EE) — This edition is built on top of SE and is meant for large-scale network applications.
- Java Platform, Micro Edition (ME) — This edition is a subset of SE and is meant for applications on small mobile devices.
- JavaFX — This is a platform for creating rich internet applications.
As already mentioned, you’ll want the Standard Edition (SE) for modding.
Java SE has three variations, or packages as Oracle calls them:
- Java SE Development Kit (JDK) — This package is for developers to want to create Java applications. This is the package you’ll need for Minecraft modding.
- Server Java Runtime Environment (Server JRE) — This package is meant for deploying Java on servers.
- Java Runtime Environment (JRE) — This package is meant for end-users who want to run Java-based applications. Because Minecraft was built with Java, this is what you need to install on your computer to play Minecraft.
Like other software, Java also has versions. The latest is version 15. Minecraft is built using Java 8. Since Minecraft modding relies on the original vanilla Minecraft code, we have to use Java 8 for modding Minecraft.
At the beginning of this section, I told you to download and install the Java SE 8 JDK. After reading this section, you should now have a better understanding of each piece of that name.
Install an IDE
Modding is programming, and that means using a programmer’s tools. While you could theoretically write all your code in a plain text editor, you’ll want an IDE (integrated development environment) to make building and testing your mod as easy as possible.

Choosing an IDE
The IDE you choose will have a big impact on your modding life, so I recommend taking some time to consider which one you want to try first, because switching IDEs can be a hassle. In the world of Java, there are two big IDEs to consider:
- Eclipse
- IntelliJ IDEA
I recommend the free Community Edition of IntelliJ IDEA primarily because I think it’s easier for beginners. It has a shorter learning curve, and its code completion and refactoring features are superior, in my experience. I also much prefer the overall aesthetic of IntelliJ, and that matters to me.
Having said that, these two IDEs were released in the same year and have many similarities and different strengths. Take a look at this article from Codota if you want a better idea of how they compare.
Eclipse gained more popularity initially but was eclipsed (har har) in popularity by IntelliJ in 2016.
Once someone picks an IDE, they tend to be pretty resistant to switching. That’s why you’ll find that many older programmers and modders use and recommend Eclipse, because that’s what they started with. That’s the main reason I started with Eclipse. I later decided to give IntelliJ a try, and found it vastly more pleasant to use.
It’s also possible to use other IDEs and tools, such as NetBeans or Visual Studio. However, Forge provides out-of-the-box modding setup scripts only for Eclipse and IntelliJ. You would need to have experience using other IDEs and a good understanding of Gradle and programming frameworks to make other IDEs work.
I will be using IntelliJ throughout this tutorial. Although nothing in the tutorial will specifically require IntelliJ, I haven’t tested this tutorial with Eclipse, let alone any other IDE. If you’re using another IDE, there may be certain steps, especially during setup, that vary somewhat from my description or do not work. You can attempt to get help with any IDE-related problems you may encounter on the Forge forums.
Install and set up IntelliJ
Here are the steps for downloading, installing, and starting up IntelliJ IDEA for the first time on an intel Mac:
- Download IntelliJ IDEA from the download page. A .dmg file will download to your computer. It is a large download.
- Double click on the .dmg file. A disk image window will appear.
- Drag the IntelliJ IDEA app to the Applications folder.
- In the Applications folder, double click on the IntelliJ IDEA app to open it.
- If you get a warning about IntelliJ IDEA being an app you downloaded from the internet, allow it.
- Accept the terms of the user agreement. IntelliJ IDEA starts loading.
- When IntelliJ IDEA is done starting up, the welcome screen appears.
If you need help installing IntelliJ, refer to the IntelliJ installation guide. I also recommend checking out JetBrains’ article on running IntelliJ for the first time.
Learn how to use your IDE effectively
I recommend taking some time to read the documentation for whichever IDE you choose and get in the habit of looking for new ways to do things. The more you know about your IDE, the better and faster you will be as a modder. If you don’t read about your IDE up front, take the time to learn something new about it every now and again while you work on your mod.
In particular, you should learn how to:
- Quickly navigate around
- Jump to source definitions
- Find where something is used
- Find/replace
- Use code completion
- Use the debugger tool
Choose a name and license for your mod
Before you get too far, you need to settle on a name for your mod, because you’ll be using it in many places as you start your mod. Changing it later on would be a huge pain, so you need to decide now.
You may have something in mind already. Before you make up your mind, consider the following tips.
- Your mod’s name needs to be unique. Besides the fact that you want your mod to be easily recognizable, if someone tries to use two mods with identical names at the same time, Forge will crash. The poor gamer may give up on your mod, and that would be sad! Take a couple of minutes to search Google and Curseforge for your name idea or a few keywords from it. If you find another mod with the same or very similar name, choose a different name.
Throughout the modding process, you’ll need to use a few variations of your mod’s name. In programming, you often need to capitalize things in certain ways or remove all the spaces from a name or other string of text. Your mod’s name is no exception. Here are some common ways of doing this, using “My Awesome Mod” as an example.
- Camel case: myAwesomeMod
- Pascal case: MyAwesomeMod
- Snake case: my_awesome_mod
- Kebab case: my-awesome-mod
- Flat case: myawesomemod
You’ll need to use one or more of these variations in different places, as described below.
Choosing a mod ID
Throughout your mod’s code, you’ll need to refer to your mod using a specialized ID. Your mod ID must meet the following requirements:
- Must be between 8 and 64 characters
- Must contain only the following kinds of characters:
- Lowercase letters
- Numbers
- Dashes
- Underscores
Some advice on choosing a mod ID:
- Avoid using dashes. They are allowed for the mod ID, but there are other areas where the dashes are not allowed. In those places, you would have to replace or remove the dashes.
- You’ll need to use either snake case, kebab case, or flat case. Snake case and kebab case can improve readability. As mentioned above, you may want to avoid hyphens, so snake case is often the best choice. Some modders may use flat case out of habit or a desire to avoid typing a few extra hyphens or underscores. It’s your choice.
- It’s usually best if your mod ID matches the name you’ll be using to promote and talk about your mod. But if for some reason you want to use a really long name for your mod, you may choose to use some kind of abbreviated version for your mod ID.
You’ll be using your mod ID all the time, so put a little thought into it before deciding.
Choosing a mod group name
Your mod’s group name is kind of like an address for your mod. It’s identical to the Java package for your mod (and if you don’t know what a Java package is at this point, please take my recommendation to learn Java seriously).
Your group name must be completely unique. Because your web presence is often unique, it’s customary to use a reversed website address. If you don’t have a personal web site or other web presence, you can use a unique web handle or the address of the version control repository you’ll set up in step X.
Your group name must contain only the following kinds of characters:
- Lowercase letters
- Numbers
- Underscores
Unlike your mod ID, your mod group name cannot contain dashes. Your mod group name should end with your mod ID.
Here are some examples:
com.benjaminrose.basketcase— This is the group for one of my mods. My personal website is benjaminrose.com, and the mod ID is “basketcase.” I use flat case for my mod ID.io.github.coolalias.coolmod— The author’s website is a personal GitHub page, “coolalias.github.io,” and the mod ID is “cool-mod.” Although the mod ID uses kebab case, dashes aren’t allowed in the group name, so the group name uses flat case.org.bitbucket.daeruin.primallib— This could be the group for one of my mods, if I didn’t have a personal website. The version control repository for my mod Primal Lib is hosted on Bitbucket at “bitbucket.org/daeruin.” The mod ID is “primallib.” I use flat case for my mod ID.mod.coolalias.my_awesome_mod— The author has no website, so they use the generic “mod” and their favorite web handle. The mod ID is “my_awesome_mod.” The author has decided to use snake case for their mod ID.
{.note} Your group name does not imply anything about where your mod is stored online. Just because you use your web address for the group name doesn’t mean you have to put a copy of your mod at that web address. We only use web addresses because they provide an already existing, widely known, and unique name registry. Using this existing naming convention makes it so the makers of Java don’t have to invent a new name registry for Java packages. For more information, see Oracle’s rules for Java package names.
Choosing a license
By default, everything you do is protected under copyright law. You don’t even have to say it’s copyrighted. It just is, automatically. This default is often phrased as “all rights reserved.” Companies often put this label on their products out of an abundance of caution, but it’s not technically necessary.
If you want to allow other people to work on your mod, either with you or without you, then you need to choose a more specific license. I recommend using choosealicense.com. It will walk you through choosing a license.
Prep your mod project
In this section, you’ll be setting up your mod project in your IDE. To create the mod project, you need to download Forge, set up your project files, and enter some basic info about your mod into certain files.
The Forge Mod Development Kit (MDK)
The Forge MDK is a set of files and scripts that will enable you to create a Minecraft mod. Here’s all the great stuff the MDK does:
- Automates some parts of creating your mod project
- Downloads the Minecraft source code to your computer
- Converts the Minecraft source code, using a process called “deobfuscation,” into a format you can read
- Applies some patches, or changes, to the Minecraft source code, giving your mod a way to insert changes into Minecraft
- Sets up methods to let you play and test your mod during development
- Provides a way to create the mod file that you can give out for others to use
The Forge MDK is an essential part of making your mod. The next few steps will walk you through downloading and installing the MDK.
Download the Forge MDK
Forge uses adfoc.us, an advertising website, to distribute its downloads and make a little money. You will have to watch an ad before you can download the MDK. Be careful! These ads can be tricky. Don’t click on the ad that appears in the middle of the screen! Doing so will most likely download adware or malware to your computer.
To download the Forge MDK:
- Go to http://files.minecraftforge.net/.
- Under Download Recommended, click the Mdk link. This will open adfoc.us.
- Wait for the timer in the top right corner to count down, then click the SKIP button.
The Forge MDK should now download to your computer. It’s a pretty small download and should complete quickly.
The file will have a name like forge-1.16.5-36.1.0-mdk.zip, where 1.16.5 is the version of Minecraft the MDK is made for and 36.1.0 is the version of the Forge MDK itself.
Get familiar with the Forge MDK
Unzip the Forge MDK. (For help with unzipping files, see this Hostinger tutorial.)
I recommend keeping the original zip file you downloaded just in case you need access to the original files in the future. However, you can delete it and redownload it later if needed.
After unzipping the MDK, you will have a folder named the same thing as your original download, without the .zip extension, for example forge-1.16.5-36.1.0-mdk.
In this folder, you will notice several files with the word “gradle” in them. Gradle is a powerful tool for building, automating, and delivering software. Forge uses it to deobfuscate Minecraft, set up your project workspace, and create the final version of your mod.
Two files in the MDK may be invisible to you, depending on how your computer is configured. These two files are .gitattributes and .gitignore. You will need these to set up version control for your mod. You don’t need to use these files now, but if you’d like to take a look, please take a moment to look online for instructions on how to see hidden files on whatever OS you are using.
Take a moment to get familiar with the files in the Forge MDK folder. I describe each file below.
.gitattributes— This file gives you a way to control certain aspects of the Git version control system. You’ll probably never need to edit this file, but you will want to keep it for version control purposes. We cover version control in step X..gitignore— This file is used for version control. It lists certain files the Git version control system will ignore when keeping track of changes. For your convenience, the kind folks at Forge have provided this list of files that commonly need to be ignored. We cover version control in step X.build.gradle— This is the script that Forge uses for setting up your modding workspace and building your mod. Without it you would not be able to build or release your mod. The script is based on Gradle, a common programming tool for producing software. See Gradle Build Scripts for more information about how Gradle scripts work.changelog.txt— This file contains Forge’s change log and isn’t relevant when starting a new mod. You may be interested in this file someday, if you have run into a bug in Forge or you’re upgrading which version of Forge your mod uses.CREDITS.txt— This file has Forge’s credits. I recommend you take a minute to read it and spend a moment of thankfulness for the efforts of those who make modding possible.gradlefolder — This folder contains the Gradle Wrapper, which consists of a couple of files that specify which version of Gradle the project will use and commands for automatically downloading the correct version of Gradle for you. Without this folder you would not be able to build or release your mod.gradle.properties— Gradle uses this file for various project settings. Forge has added a setting to disable the Gradle Daemon process, because Forge doesn’t yet work with the Gradle Daemon. (You can use this file to create your own variables for use bybuild.gradle, but I will not be covering that process in this tutorial.)gradlew— This is the script Gradle uses to start up the Gradle Wrapper on Unix-based computers like Mac OS X, Linux, and Solaris computers. If you aren’t using a Unix-based computer, you may still need this file if you ever set up an automated build pipeline (which may be covered by this tutorial in the future).gradlew.bat— This is the script Gradle uses to start up the Gradle Wrapper on Windows computers. If you aren’t using a Windows computer, you may still need this file if you ever set up an automated build pipeline (which may be covered by this tutorial in the future).LICENSE.txt— Forge’s license is in this file. If you ever read software licenses, you are one in a million and may find this interesting.README.txt— You shouldn’t need this file. Everything it says is already covered by this tutorial.srcfolder — This folder will hold all your mod’s code, textures, and so forth. There are a number of folders and files in here already. The folder structure is set up a in a particular way that Forge requires, although we will be making a few changes here and there for your mod.
Now that you know what the Forge MDK files are for, let’s get your project set up.
Set up your project files
It’s common practice among programmers to create a directory somewhere to keep all their programming projects. It’s a good way to keep your work organized, especially if you end up making more than one mod.
- At the root of your user directory, create a folder called
Developer. (The location doesn’t particularly matter, but putting it at the root of your user directory makes it more convenient to access on the command line. The name doesn’t really matter, either. You can choose something else. Just make it something fairly generic. Don’t name it after a specific mod. Use a name without spaces. This will make it easier to type on the command line, if you end up needing to do that someday.) - Move the Forge MDK folder into your new developer folder. You will be using this folder as your mod’s main project folder. I recommend using this folder so you don’t have to worry about trying to move the two Git files that are often hidden.
- Rename the Forge folder to your mod ID. (If you haven’t chosen a name yet, see the step on choosing a mod name for some advice.)
- Replace the contents of
LICENSE.txtwith the text of the license you chose. This will inform other people about what they are allowed to do with your mod. - Delete the following files. You won’t need them.
changelog.txtCREDITS.txtREADME.txt
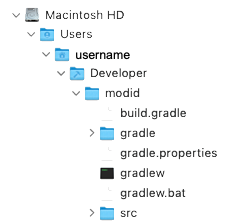
Your folder structure should look something like this:
Update build.gradle
The build.gradle file is a Gradle script that sets up your modding workspace and builds your mod. Forge provides a generic script that you need to update with details about your mod before you can set up your mod project in the IDE. Below, I’ll describe the changes you need to make to your build.gradle file.
Enter your mod’s version number
On line 16 of build.gradle, you’ll see a line starting with version =. This is where you will define the current version number of your mod. The version number will become part of the filename of your released mod and will also be displayed in the game in Forge’s mod menu.
To start out, I recommend setting your initial version number like this:
version = 1.16.4-0.1.0
Replace 1.16.4 with the version of Minecraft you are building your mod for. This should match the version number on the Forge MDK download. The 0.1.0 indicates your mod hasn’t had an official release yet and is under development with no bug fixes.
As you develop your mod, and after you release it, you’ll need to regularly update this version number. The following sections explain how to update your mod version properly. They also explain some alternate formats for version numbers that you may want to consider. It’s important to make a good decision now and be consistent with how you update the version number in the future.
Versioning basics
There are many ways to specify your mod’s version. For the sake of those using your mod, it’s important for you to follow some basic standards and be consistent with how you update your version numbers.
One common way of identifying software versions is SemVer, which is short for Semantic Versioning. SemVer has some good ideas, and you should read more about it on the Semantic Versioning website. Using SemVer encourages your versioning to be meaningful in a way that’s easy to understand and predict. When users see your version number change, they have a general idea of how your mod may have changed.
In a nutshell, SemVer recommends this format:
MAJOR.MINOR.PATCH
Example: 1.4.9
The MAJOR version number should be incremented when you make big changes that are incompatible with previous versions of your mod. For example:
- Removing blocks or items from your mod.
- Changing or removing existing functionality.
- Updating your mod to work with a new version of Minecraft (maybe—see more info below).
The MINOR version number should be incremented when you add new functionality that is still compatible with older versions of your mod. For example:
- Adding new blocks or items.
- Adding new functionality that weren’t there before.
The PATCH version number should be incremented when you make bug fixes in a way that’s still compatible with older versions of your mod. For example:
- Fixing a typo on an item’s tool tip.
- Fixing an incorrect texture.
- Fixing existing functionality that wasn’t working as intended.
SemVer is a good standard, but it isn’t quite sufficient for modding purposes. You’ll need to make a few modifications as described below.
Using an API version number
The Forge documentation recommends using four version numbers, with the second number being dedicated to your mod’s API and the other numbers as described above.
If your mod is going to have an API, please read Forge’s documentation page on versioning for more information.
If you don’t know if your mod will have an API, you can either make the second number a permanent zero (for example 1.0.1.7) or just use three numbers (for example 1.1.7).
In this tutorial I assume you won’t use an API version, so your mod version will only have three numbers. If you do use four numbers, all the same principles apply.
Indicating the version of Minecraft
In addition to the MAJOR, MINOR, and PATCH version numbers, you should always include which version of Minecraft your mod is built for. The Forge documentation recommends adding it in front of your mod’s version number, separated by a hyphen, like this:
1.16.4-1.4.9
The above example indicates a mod built for version 1.16.4 of Minecraft, and the mod itself is version 1.4.9 of the mod. This is how the Forge MDK itself is versioned.
Some modders put the minecraft version at the end with “mc” to indicate which one is the Minecraft version. For example:
1.4.9-mc1.16.4
Increasing the version number before the official release
While you’re still developing your mod, you may want to release work-in-progress versions of your mod. This enables you to get feedback early on in the process and fix bugs or adjust to user expectations.
Increasing the MAJOR version. Before your first official release, the MAJOR version number should always be 0. This indicates that your mod is still under development, so its functionality might not be fully developed, and it will probably have bugs.
Increasing the MINOR and PATCH version. You can continue updating the MINOR version as you add new functionality and the PATCH version as you fix early bugs. Whenever you increase a MINOR version number, you should reset the PATCH version number back to 0.
For example, let’s say you get some of the major features of your mod done and release version 0.1.0. Then one of your early users reports a bug. You fix the bug and make the new version of your mod available with the bug fix. You increase the PATCH version, so your overall version is now
0.1.1. Then let’s say you add a new block to your mod and make this new version of your mod available. You now increase the MINOR version and reset the PATCH version, so your overall version is now0.2.0.
Increasing the version number during pre-release
When your mod is getting close to ready for an official release, you can put it through several standard phases in preparation for the release.
-
Alpha — Software developers typically refer to an alpha release as the earliest version of the mod that’s worth sharing with users. The software isn’t completely done. It may have bugs and even unfinished features, but it’s ready enough to have a few people try it out.
If you’re releasing your mod on CurseForge, releases marked as alpha will not show up in searches.
- Beta — After a few iterations of bug fixes and feature enhancements, software moves to a “beta” release, where the software is more stable than it was in alpha, and most of the features are done.
- Release Candidate — After the software has been in beta for a while, some software companies then have a “release candidate” or RC phase. The features are all complete, and the software is considered done. But they want to test it a little while longer to see if any more bugs pop up. The only changes that should be made during RC are bug fixes.
- Pre-Release — There’s not much agreement on when or if to use this as a separate phase. The Forge documentation doesn’t recommend using it.
You can indicate these phases of development by adding -alpha, -beta, or -rc to the end of your version number. Typically you would only do this when you are almost ready to do an official release.
For example, let’s say you’re done with the first version of your mod and are ready for an official release. You increase the MAJOR version number to 1, reset all the other numbers to 0, and add
-alpha1. Your mod is now in an alpha phase with a version number of1.0.0-alpha1. If you end up making changes during the alpha phase, change it to-alpha2, then-alpha3, and so on. These changes could be major changes or minor bug fixes.Once you feel good about progressing to beta, change it to
-beta1. At this point your version is1.0.0-beta1. If you make changes during beta, change it to-beta2.When it’s as solid as you think it can be, change it to
-rc1. At this point your version is1.0.0-rc1and you should only be making bug fixes.Finally, when you want to make the release official, remove the
-rcsuffix completely. Your version is now1.0.0, and you mod is officially released!
You could skip some of the phases, or you could not use them at all. It depends on how much feedback you want to get and how careful you want to be before making an official release.
Increasing the version number after the official release
Whenever you increase a MAJOR or MINOR version number, you should reset the other numbers back to 0.
For example, if your current version is
1.4.3, and you’re releasing a MINOR update, your version number would change to1.5.0. If your current version is1.4.3, and you’re releasing a MAJOR update, your version number would change to2.0.0.
Adding a build number. Some people add an extra version number as a sort of counter that increments each time they build their mod, independently of the other version numbers. (Some people also use the PATCH version number for this purpose.)
For example, the current version might be
1.4.3.45, and releasing a MAJOR update would increase the version number to2.0.0.46. This is done so that every version has a unique number as its identifier, even if it’s a version that was never released. This can be useful for troubleshooting purposes.
Mod versioning for multiple Minecraft versions
Each major version of Minecraft is unique, and often Forge has to be updated along with new Minecraft versions. For this reason, you generally have to update your mod every time there’s a new major version of Minecraft.
Updating your mod to a new major Minecraft version. When updating your mod to a new major version of Minecraft, you should update the MAJOR version of your mod and reset the lower version numbers back to 0.
For example, if your current version is
1.12.2-2.4.0, and Minecraft 1.13 comes out, you would update your mod to work with Minecraft 1.13 and release the update as1.13-3.0.0.
Updating your mod for multiple major Minecraft versions. If you continue to add the same functionality to your mod for both an older major Minecraft version and a newer major Minecraft version, you should update the MAJOR version on both versions of your mod.
Following the prior example, the newer version would be labeled as
1.13-3.0.0and the older version would be labeled as1.12.2-3.0.0, because it has all the same features and functionality, just for a different version of Minecraft.
Making bug fixes only for older Minecraft versions. If you are not planning to add new functionality to the older version of your mod, leave the MAJOR version as is. If you maintain the older version by fixing bugs, update the PATCH version only.
Deprecating your mod for older Minecraft versions. If you drop support for an older version of Minecraft, the last release of your mod for that Minecraft version should get the suffix -final.
For example, if an older version of your mod is at
1.8.9-4.2.3, and you decide you’re no longer going to update you mod for Minecraft 1.8.9 anymore, you’d change the build number to1.8.9-4.2.3-final.
Updating your mod to a new minor Minecraft version. Minor releases of Minecraft generally consist of only bug fixes or very minor updates. You may be able to release your mod for minor Minecraft updates without making any changes at all. If that happens, simply update the Minecraft version on your mod and leave the rest of the version number the same.
For example, let’s say your mod has been released for 1.12 and has a version number of
1.12-2.3.0. Minecraft 1.12.1 comes out, and your mod works with this new version just fine without making any changes. You could release your mod for Minecraft 1.12.1 with a version label of1.12.1-2.3.0.
Last words about versioning
There are many perfectly legitimate ways of versioning your mod, but you should strive to follow the community standards I’ve described above unless you have a good reason to do otherwise. If you choose to follow another convention, make sure you’re being clear and consistent for the sake of your mod’s users.
Enter your mod group
Right below the version line in build.gradle is a line starting with group =. Here you will enter the mod group name you’ve chosen. (For help picking a mod group name, see Choosing a mod group name.) Remember that it needs to be all lowercase. It can have numbers and underscores but not dashes.
Example: group = com.benjaminrose.basketcase
Enter your mod ID
Right below the group in build.gradle is a line starting with archivesBaseName =. This determines the name of the file that’s created when you’re ready for others to use your mod.
Replace modid with your mod’s ID. (For help picking a mod ID, see Choosing a mod ID.)
Example: archivesBaseName = basketcase
If you want the file name to be pretty, you could consider using Pascal Case.
Example: archivesBaseName = BasketCase
Other changes to build.gradle
Near the top of the build.gradle file, you’ll see a line that says:
// Only edit below this line, the above code adds and enables the necessary things for Forge to be setup.
Below that line, you can make many other changes to your build.gradle file. Most changes you could make are beyond the scope of this tutorial and would require you to learn more about how Gradle works.
One change you should make is described in the next section.
Update the Minecraft mappings to use Parchment
I highly recommend updating your Minecraft mappings to use Parchment. It’s not required, but it will make your modding life a lot easier. But what are mappings?
When the developers at Mojang work on Minecraft, they come up with meaningful names for classes, variables, and so forth to make their work easier. When they release Minecraft to the world, they obfuscate their code by turning the meaningful names into random characters. This protects their intellectual property and makes it harder to hack. It also makes it nearly impossible to write mods. Because Mojang actually wants us to be able to mod Minecraft, they release a mapping that lets us deobfuscate some of the code and see the meaningful names they originally created.
The build.gradle file already includes Minecraft’s official mapping. You’ll find it around line 40 of build.gradle:
mappings channel: 'official', version: '1.18.2'
The official mapping only includes names for classes, interfaces, and methods. Unfortunately, it doesn’t provide names for parameters. To fix that, some programmers in the modding community have generated their own meaningful parameter names and created a mapping you can use. Their mapping is called Parchment.
To use Parchment so you can see meaningful parameter names, make the following changes to your build.gradle:
-
At the very top of
build.gradleis thebuildscriptsection. Insidebuildscriptare two other sections,repositoriesanddependencies.Add the following line to the
repositoriessection, right abovemavenCentral():maven { url = 'https://maven.parchmentmc.org' }Add the following line to the bottom of the
dependenciessection:classpath 'org.parchmentmc:librarian:1.+' -
Beneath the line that says
apply plugin: 'net.minecraftforge.gradle', add a new line:apply plugin: 'org.parchmentmc.librarian.forgegradle'The first several lines of your
build.gradleshould now look like this:buildscript { repositories { // These repositories are only for Gradle plugins, put any other repositories in the repository block further below maven { url = 'https://maven.minecraftforge.net' } maven { url = 'https://maven.parchmentmc.org' } mavenCentral() } dependencies { classpath group: 'net.minecraftforge.gradle', name: 'ForgeGradle', version: '5.1.+', changing: true classpath 'org.parchmentmc:librarian:1.+' } } // Only edit below this line, the above code adds and enables the necessary things for Forge to be setup. plugins { id 'eclipse' id 'maven-publish' } apply plugin: 'net.minecraftforge.gradle' apply plugin: 'org.parchmentmc.librarian.forgegradle' -
Around line 25 is the
minecraftsection. Inside it, around line 40, is the line that specifies the mapping:mappings channel: 'official', version: '1.18.2'Change
officialtoparchment. Then change the version to the latest release version of Parchment for the version of Minecraft you’re modding for. You can find the release versions on Parchment’s site. This tutorial is about version 1.18.2 of Minecraft, and when I wrote this, the latest version of Parchment for that Minecraft version was2022.11.06. This was the resulting mapping for me:mappings channel: 'parchment', version: '2022.11.06-1.18.2'
If you’re following this tutorial step by step, that’s all you need to do.
If you’ve already done the next step by importing your mod project into IntelliJ, you need to refresh Gradle. Open the Gradle tab by clicking on the elephant icon on the right edge of IntelliJ, then click the refresh icon.
Now when you look at Minecraft’s source code in IntelliJ, you’ll be able to see meaningful parameter names. This will make it much easier for you to understand Minecraft’s code.
Import your mod project into IntelliJ
In IntelliJ, opening and importing a project are the same thing. IntelliJ can open (or import) the Gradle files in the Forge MDK to automatically set up your modding project for you.
- Open IntelliJ. The welcome screen appears.
- Click Open.
- Select your mod’s folder (the former Forge folder that you renamed to your mod ID).
- You may get a message about trusting the project in this folder. Since we trust Forge not to contain malicious code, indicate that you trust the project.
- IntelliJ will now open the Gradle files and set up your mod project. The Build pane and the status bar at the bottom will display information about what it’s doing. This may take several minutes. When it’s done, it will say BUILD SUCCESSFUL.
Set up version control
Modding is programming, and that means using a programmer’s tools. You’ll want to use version control to keep track of your changes and make it easier to get help and collaborate. The sooner you get your version control system set up, the better off you will be.
In this part of the tutorial, I’ll introduce the idea of version control, recommend options for a version control provider, and get you started using version control. However, learning the details of version control is outside the scope of this tutorial, much like learning Java. There are many fantastic tutorials about this subject out there already. I’ll recommend some resources to help you become proficient.
Benefits of version control
Version control, often called source control, is beneficial in several major ways.
- Version control lets you undo your changes and restore older changes. Sometimes when programming, you make changes you wish you could undo. Your IDE will let you undo a certain amount of recent changes, but sometimes you get really far down a certain path before you realize it was completely wrong or that you made a change a long time ago that you shouldn’t have made. You may in fact have messed up your mod badly and need to go back to a time when you know it was working. Version control is like a very powerful undo feature that can really get you out of a tight spot
- You will likely want to release different versions of your mod. You may add new features or fix bugs, or you may want to release your mod for a new version of Minecraft. Version control helps you keep track of the state of your mod for each version you release. You can even switch back and forth between working on different versions at any time.
- You may want to work on your mod on different computers, like a desktop computer at home and a laptop while traveling. Version control makes it easy to sync your changes on multiple computers.
- You may want to start collaborating with others. This includes getting help from the Forge forums or other places. Often the only way someone can help you is by seeing your code. Version control makes it easy to link to certain parts of your code. You may also find yourself wanting to work on your mod with another modder. With version control, each of your collaborators sync your latest changes easily to your own computers.
While you could theoretically achieve some of these goals with modern file backup and cloud sharing services, such services simply aren’t built to handle all the needs of a programmer creating software—which is what you are doing by creating a mod.
That’s why I recommend using Git. Git is a version control system that provides all the benefits mentioned above and is extremely common in the world of programming.
There are other version control systems, such as Mercurial. You can use another system, but this tutorial will only cover Git.
Choose an online Git provider
To reap the full benefits of version control, you’ll want a Git provider. The Git provider will store all your mod’s code and other assets in a central location in the cloud and let you download and interact with your mod using Git. In addition to providing version control, Git providers offer the following helpful features:
- Built-in issue trackers to help you track bugs and feature improvements.
- Built-in wikis so you can easily write up documentation for your mod.
- Snippet sharing so you can share specific parts of your code easily. This can be very useful when you’re trying to get help on the Forge forums, for example.
- Free private repositories, which can be nice if you don’t want to share the source code for your mod.
- CI/CD pipelines so you can automatically build, test, and distribute your mod every time you check in a change. More on this later.
When choosing a Git provider, there are three main options:
- GitHub
- GitLab
- Bitbucket
Any of these three will be perfectly sufficient for your modding project. There are a few minor considerations that might swing you towards one or the other.
- GitHub
- GitHub is by far the most popular of Git providers and has a large number of users. This makes it a little easier to collaborate on mods, because a lot of modders already have GitHub accounts.
- GitHub has a huge community of open source projects. GitHub was purchased by Microsoft in 2018, which caused a lot of open-source supporters to leave GitHub, but GitHub still has more open source projects than the others.
- GitHub is very fast and has a well-developed and widely praised UI.
- GitHub has built-in integration with the Sourcetree Git client, which I will recommend in the next step.
- GitLab
- GitLab is open source and is widely used by open source supporters who were unhappy when Microsoft purchased GitHub.
- You can self host a GitLab instance instead of using GitLab’s hosted service. This is an interesting alternative for those who are savvy enough to do it. Apparently the self-hosted service is much faster and more reliable.
- Bitbucket
- You can let people download your mod directly from Bitbucket if you want. This isn’t super important, because you probably won’t want this to be your main method for distributing your mod, but it can be helpful sometimes.
- Bitbucket has a native integration with the project tracking systems Jira and Trello, since they are all owned by the same company, Atlassian. If you are familiar with Jira or Trello and would like to use them, the integration can be nice, especially for team collaboration. Note that GitHub also has integrations with Jira and Trello.
- You can only have five team members on Bitbucket’s free tier—this could impact your choice if you’re anticipating a large team project.
- Bitbucket has built-in integration with the Sourcetree Git client, which I will recommend in the next step. In fact, Bitbucket and Sourcetree are made by the same company, so if you choose Bitbucket you’ll only need to make one Atlassian account to use both applications.
All things considered, I recommend GitHub for new modders because it’s slightly easier to use and most other modders are using it. My second recomendation would be Bitbucket because of its downloads feature and nice integrations. Both GitHub and Bitbucket have built-in integrations with Sourcetree, which I recommend as a Git client in the next step. GitLab can also work fine.
I personally use Bitbucket and have been perfectly happy with it. My main motivation for choosing Bitbucket several years ago was that it offered private repositories on its free tier and GitHub didn’t (however, these days GitHub does offer free private repositories). Secondarily, I had been using Jira and Confluence at work, and I already had a private Atlassian account. It just made the choice a tiny bit easier. Bitbucket’s download feature has been nice. Some of my mods have dependencies on my other mods, so I use Bitbucket’s download feature to download unreleased versions of my own mods and update those dependencies as I work on them in between major releases.
At the end of the day, you can choose any of the three Git providers listed above and have everything you need for a typical Minecraft modding project. The most important part is simply to have version control, regardless of which provider you choose.
Get started with Git
One of the challenges of Git is that it was made to be used on the command line. If you are comfortable using the command line, that’s great. I personally prefer using Git on the command line, and there are many resources online to help you learn and use Git from the command line. In fact, most tutorials and resources for learning Git assume you are using the command line.
If you are like many other beginning modders and even experienced programmers, you may find it more pleasant interacting with Git using software with a nice, user-friendly interface. However, be aware that you will probably run into a limitation with the software that will require you to use the command line.
Both approaches are fine. You may start learning Git one way and decide to try the other way after a while. As a starting modder, I recommend that you pick one of the learning resources I recommend below that suits your learning style and run with it. This will likely mean you’re learning to use Git on the command line. In the long run, that is probably a healthy thing. However, you can also jump into the instructions below and get by with that for a while before learning Git more in-depth.
There are many paths to setting up version control.
http://jabelarminecraft.blogspot.com/p/minecraft-forge-publishing-to-github.html
https://confluence.atlassian.com/get-started-with-sourcetree/get-started-with-sourcetree-847359026.html
- Create GitHub or Bitbucket account
- Install SourceTree - choose the embedded version of Git - Installation is the first step, followed by several others, some of which are optional.
- Accept the Atlassian customer agreement
- Connect to existing Atlassian account, or create a new one on their Website
- Connect to your Git account
GitHub Desktop
https://docs.github.com/en/desktop/installing-and-configuring-github-desktop/setting-up-github-desktop#part-1-installing-github-desktop
- Sign up for a GitHub account
- Must install Git first
- Set up Git inside GitHub Desktop
IntelliJ
- Put an existing project under Git version control - https://www.jetbrains.com/help/idea/set-up-a-git-repository.html#put-existing-project-under-Git
- If Git isn’t installed, IntelliJ suggests installing it
- Add remote - https://www.jetbrains.com/help/idea/set-up-a-git-repository.html#add-remote
- Create empty repo in GitHub or Bitbucket
- Commit changes - prompted to specify username - done in Terminal - https://www.jetbrains.com/help/idea/commit-and-push-changes.html#git-username
- Push changes - https://www.jetbrains.com/help/idea/commit-and-push-changes.html#push
- The Define remote link will appear - specify remote name and URL
Top Git GUI clients: https://acodez.in/git-gui-clients/
# Document your mod
- readme.md
- wiki
- custom book for your mod
- JEI
- tool tips